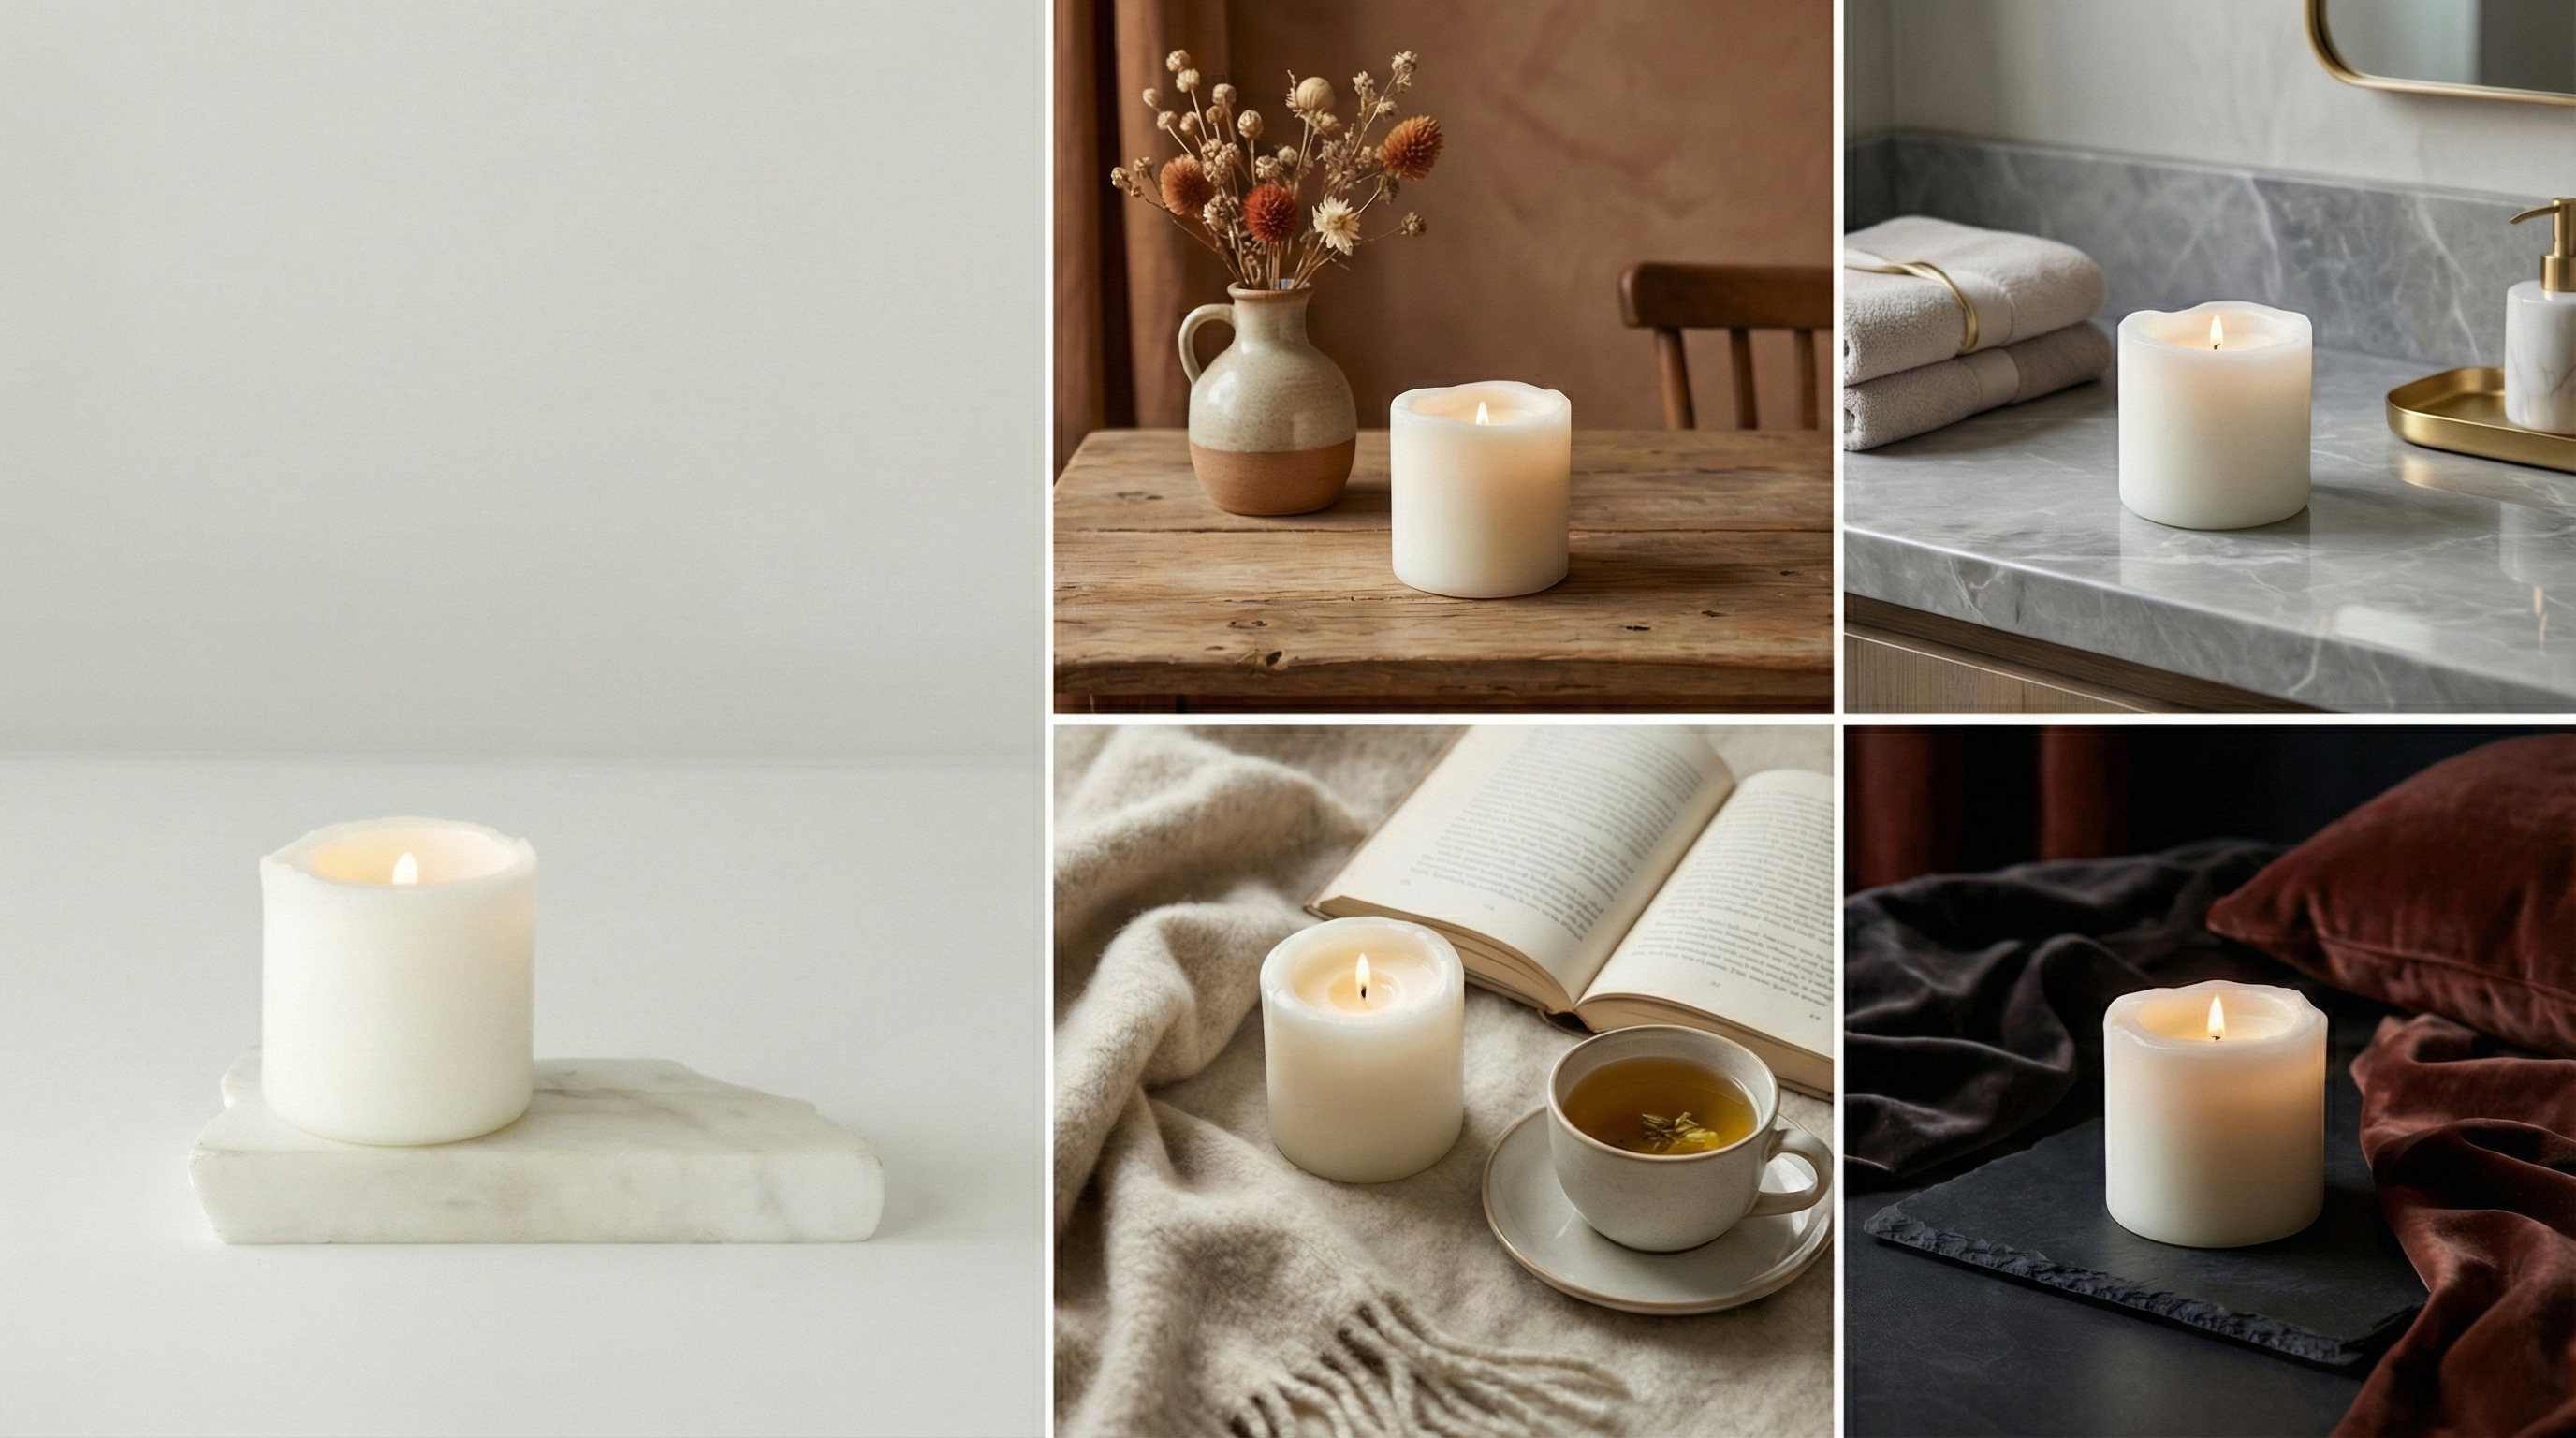
You know you need better product photos for your Etsy shop. You've read the guides, watched the tutorials, and you understand that professional lifestyle images are the difference between 12 views and 120 sales.
But here's the problem: you don't have three hours to spend on a photoshoot. You don't have a collection of aesthetic props. And you definitely don't have $1,000 to hire a professional photographer every time you launch a new product.
What if I told you that you could create eight professional, Etsy-ready lifestyle photos in less time than it takes to make a cup of coffee?
This isn't theory. This is a step-by-step walkthrough of exactly how to transform one basic product photo into a complete gallery of conversion-optimized images in under five minutes. No photography experience required.
What You'll Need (Spoiler: Not Much)
Before we dive into the step-by-step process, let's talk about what you actually need to make this work:
The Absolute Minimum
One decent product photo- This can be a smartphone photo taken with natural window light against a clean background. It doesn't need to be perfect, just clear and in focus.
5 minutes of uninterrupted time- Seriously. Set a timer if you don't believe me.
A free Stageflow account- You get 10 credits to start, which means 10 professional photos before you pay a cent.
What You DON'T Need
Ring lights, photo tents, or expensive camera equipment
A collection of props and styling materials
Photography skills or editing software experience
Multiple hours blocked off in your calendar
Ready? Let's create your first professional product photo.
Step 1: Start With Your Source Photo (30 Seconds)
The only photo you need to take yourself is a clear shot of your product. Here's the formula:
Good lighting- Stand near a window during daytime. Natural light is your friend.
Clean background- White poster board, a clean wall, or even a white bedsheet works perfectly.
Fill the frame- Get close enough that your product is the main focus, but not so close that edges are cut off.
Keep it straight- Hold your phone level. A slightly crooked photo is fine, but extreme angles make AI generation harder.
That's it. Take the photo, and you're done with the hardest part.
Pro Tip: Multiple Angles Save Time Later
If you're photographing your product anyway, take three quick shots from different angles (front, side, overhead). You can upload up to three design images at once in Stageflow, which gives the AI more context to work with and produces even better results.
Step 2: Upload to Stageflow (30 Seconds)
Log into your Stageflow account and navigate to your project dashboard. If this is your first time, you'll already have a starter project created for you and you will go straight to the image generation screen.
Click into your project, and you'll land on the generation page. Here's what to do:
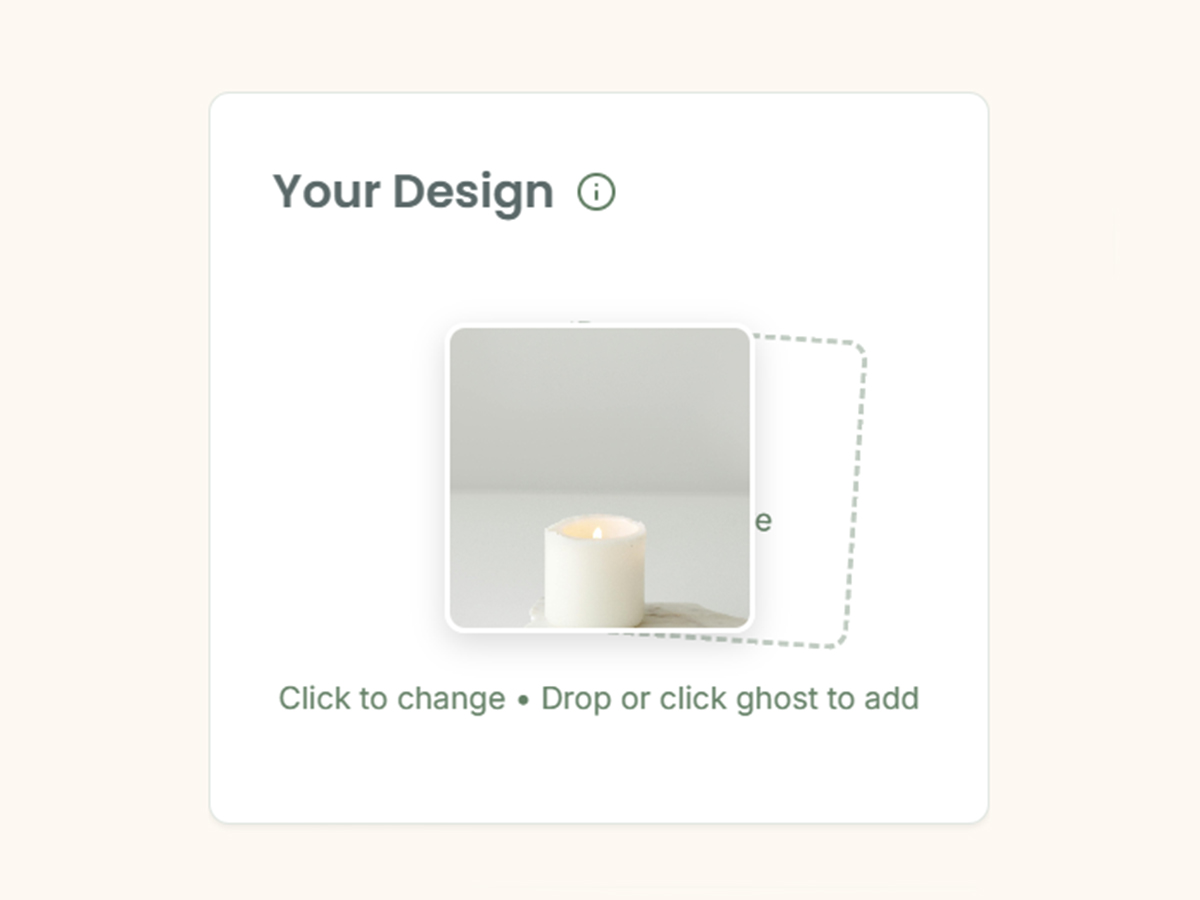
Click the "Upload Design" area (or drag and drop your photo directly)
Select your product photo from your phone or computer
Wait about 10 seconds while it uploads
You'll see your product photo appear in a card at the top of the interface. If you took multiple angles, upload those too. They'll stack neatly in the upload area.
Step 3: Choose Your Aesthetic Direction (1 Minute)
This is where the magic starts. You're going to tell Stageflow what kind of lifestyle scene you want your product placed into.
You have two options here, and both work beautifully:
Option A: Browse the Vibe Library (Recommended for Beginners)
Click "Browse Library" to open the vibe gallery. You'll see 41 professionally curated aesthetic presets organized into categories:
Minimalism- Clean, Scandinavian-inspired, modern
Boho- Warm terracotta tones, natural textures, relaxed vibes
French Country- Romantic, vintage, lavender and lace
Coastal- Light, airy, ocean-inspired blues and whites
Coquette- Soft pinks, bows, feminine and playful
Dark Academia- Moody libraries, leather, scholarly aesthetic
Retro- 70s funk, 80s neon, Y2K nostalgia
Little Luxe- Kid-friendly aesthetics with elevated styling
Browse through the categories and click on any vibe that matches your brand. Don't overthink this. If you sell handmade soy candles and your target customer loves cozy, earthy vibes, pick something like "Terracotta Sunset" or "Warm Neutral Embrace."
The vibe you choose will influence the color palette, lighting style, and prop selection in your generated image.
Option B: Describe It Yourself
If you have a specific vision, skip the vibe library and jump straight to the text prompt field. Describe exactly what you want:
My candle on a wooden coffee table next to an open book and a linen throw blanket, with warm afternoon sunlight coming through sheer curtains
The AI understands natural language. Write like you're describing a scene to a friend, not like you're coding a computer.
Step 4: Select Environment and Framing (30 Seconds)
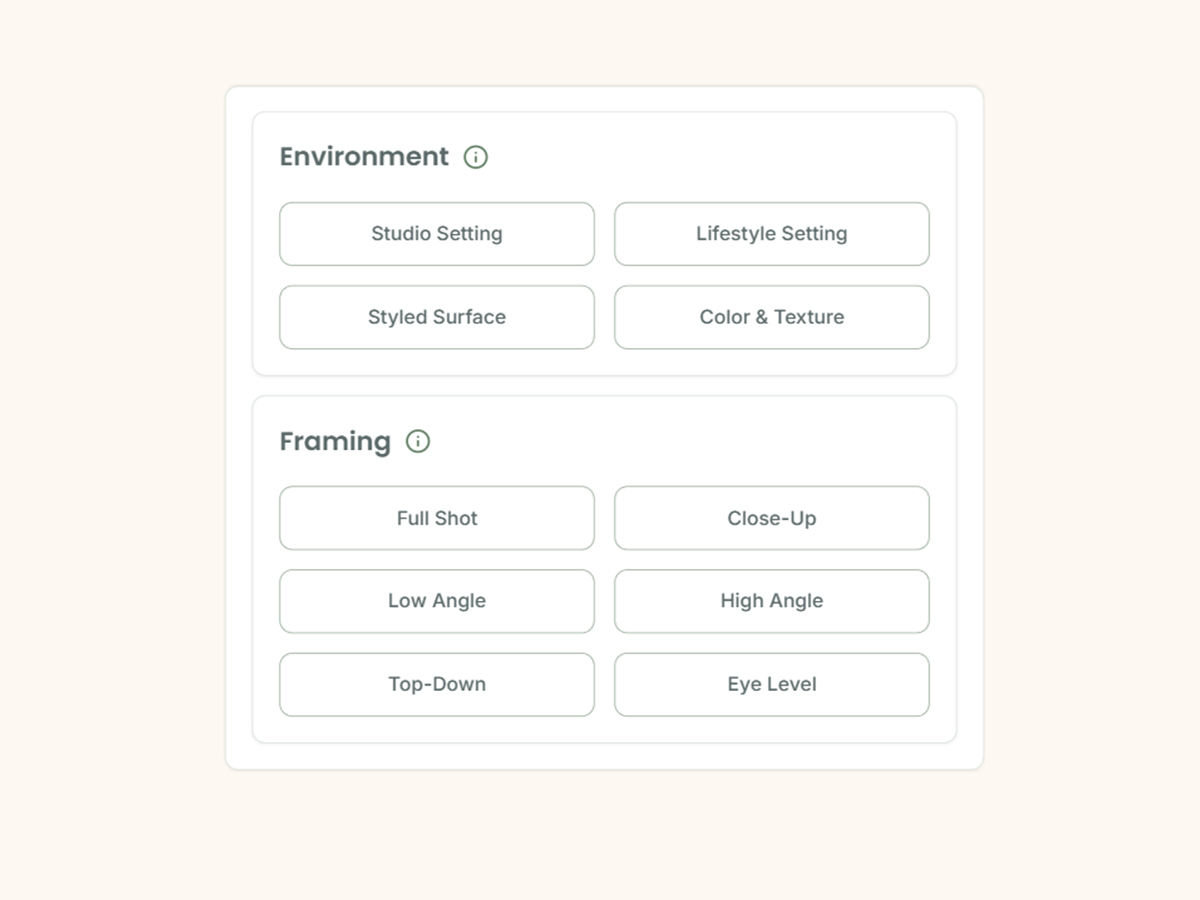
Scroll down slightly and you'll see two rows of pill-shaped buttons:
Environment Options
Studio- Clean, controlled lighting with professional backdrop
Lifestyle- Real-world settings like living rooms, kitchens, bedrooms
Outdoor- Natural settings with daylight and organic elements
Minimalist- Plenty of negative space, simple and uncluttered
Framing Options
Full Shot- Complete product view with context and surroundings
Hero Shot- Dramatic angle that emphasizes your product as the star
Close-Up- Tight framing showing texture and detail
Flatlay- Overhead view, perfect for styled arrangements
For your first image, try Lifestyle + Hero Shot. This combination creates that scroll-stopping "wow" image that works perfectly as your Etsy listing's main photo.
Step 5: Generate Your First Image (30-60 Seconds)
You've uploaded your design. You've chosen a vibe (or written a prompt). You've selected environment and framing.
Now comes the satisfying part: click the "Generate" button.
Here's what happens next:
A ripple animation appears, confirming your request is processing
The AI analyzes your product photo and builds a photorealistic scene around it (this takes 30-60 seconds)
Your generated image appears on the canvas
After about 1.5 seconds, you're automatically taken to the image editor page
Take a moment to appreciate what just happened. You went from a basic white-background product photo to a professionally styled lifestyle image in under a minute. No props purchased. No lighting setup. No hours of editing.
Step 6: Refine or Accept (Optional, 1-2 Minutes)
On the image editor page, you have several options:
If You Love It
Click "Download" and save the image to your computer. If you're on the Creator or Studio plan, click "Download HD" to get the upscaled 4k version that meets Etsy's image requirements.
If You Want to Tweak It
Click "Edit" and type what you'd like to change:
"Make the background darker for more contrast"
"Add a coffee mug next to the candle"
"Change the wood surface to white marble"
"Increase the warm glow from the candle"
The AI will regenerate the image with your requested changes. This costs one additional credit, but you're iterating toward exactly what you want.
If You Want to Try a Completely Different Vibe
Click the back button to return to the generation page. Your original design is still uploaded. Simply choose a different vibe from the library (maybe switch from Boho to Coastal) and generate again.
This is how you'll create variety for your Etsy listing.
Step 7: Create Variations for Your Full Gallery (3 Minutes)
Here's where the "under 5 minutes" claim becomes real. You're going to generate seven more images by simply changing the vibe and hitting generate again.
Your product photo is already uploaded. The interface remembers your settings. All you need to do is:
Click back to the generation page
Open the vibe library and select a different aesthetic (e.g., switch from "Scandinavian Light" to "Terracotta Sunset")
Click Generate
Wait 30-60 seconds
Download the new image
Repeat 6 more times with different vibes
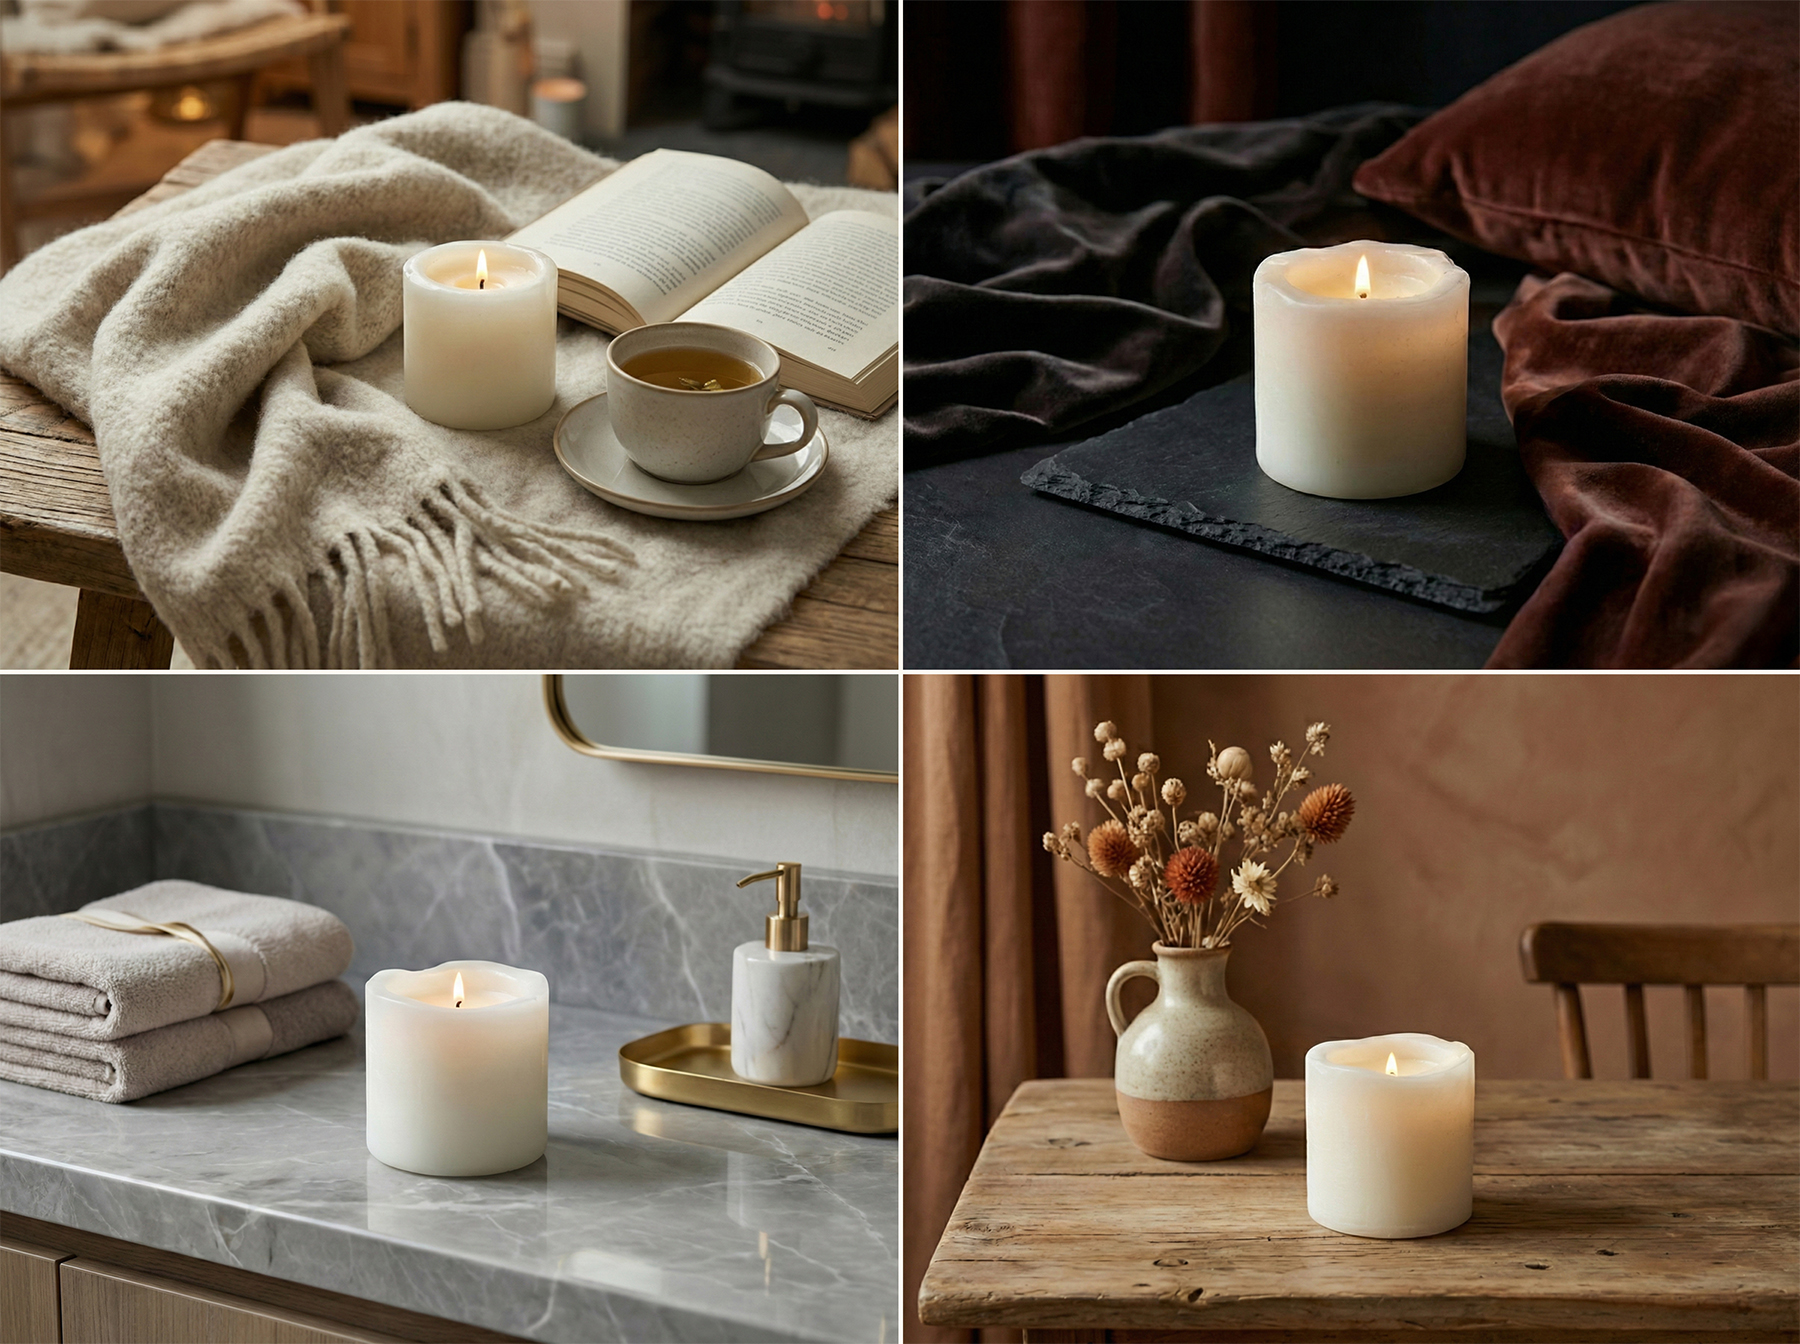
In three minutes, you'll have generated images in multiple aesthetics:
Minimalist Scandinavian (for the clean aesthetic crowd)
Warm Boho Terracotta (for the earthy, cozy buyers)
Coastal Blue Serenity (for the beach house aesthetic)
Dark Academia Library (for the moody, scholarly vibe)
French Country Lavender (for the romantic, vintage lovers)
Outdoor Natural Light (for the organic, wellness market)
Studio Professional (for the luxury, high-end positioning)
Flatlay Styling (for the Instagram aesthetic)
Each one speaks to a different segment of your potential customers. You're no longer choosing one aesthetic and hoping it resonates. You're showing your product in multiple contexts and letting customers see themselves in the scene that matches their personal style.
Step 8: Download and Upload to Etsy (30 Seconds)
Once you've generated your gallery of images, head to your project dashboard. You'll see all your generated images displayed in a grid.
Click the checkbox on each image you want to use (or click "Select All"), then click the bulk download button. All your images download as a zip file to your computer.
Unzip the folder, and you have eight professional, Etsy-ready lifestyle photos.
Now upload them to your Etsy listing:
Go to your Etsy shop dashboard
Edit your listing or create a new one
Upload your images in this strategic order:
Image 1: Hero shot (most dramatic, eye-catching angle)
Image 2: Close-up detail shot
Image 3: Lifestyle scene from different angle
Image 4: Flatlay overhead styling
Image 5-8: Alternative vibes and contexts
Add descriptive alt text to each image for SEO
Save and publish
Congratulations. You just created a professional product photography gallery that would have cost $500-2,000 from a photographer and 13+ hours of your time. You did it in under five minutes.
The Real-World Time Breakdown
Let's verify the five-minute claim with actual numbers:
Upload design photo: 30 seconds
Select vibe and settings: 30 seconds
First generation: 45 seconds (average)
Change vibe + generate (×7): 3 minutes 30 seconds
Bulk download all images: 20 seconds
Total time: 5 minutes 35 seconds
And that's being conservative. Once you've done this a few times, you'll move even faster because you'll know exactly which vibes work best for your products and your brand.
Before and After: What This Actually Looks Like
Let's talk real examples. Here's what Etsy sellers are creating with this exact process:
Example 1: Soy Candle Seller
Starting photo: iPhone shot of cream-colored candle on white poster board, natural window light, slightly crooked but clear focus.
Five minutes later: Eight lifestyle photos including:
Candle on rustic wooden shelf with vintage books (Boho aesthetic)
Candle on white marble with eucalyptus branch (Minimalist aesthetic)
Candle glowing on nightstand with linen bedding (Coastal aesthetic)
Candle in moody library setting with leather chair (Dark Academia)
Flatlay with candle, matches, and dried flowers (Instagram aesthetic)
Close-up of candle texture and label detail
Candle in gift box presentation (packaging shot)
Candle on outdoor garden table with natural light
Example 2: Handmade Mug Seller
Starting photo: Ceramic mug centered on white background, taken with smartphone camera.
Five minutes later: Eight variations showing the mug in different contexts that appeal to different buyer personas (minimalist coffee lovers, cottagecore tea enthusiasts, professional home office buyers, etc.).
Result: Customer messages asking "Do you have this in [specific color]?" dropped by 60% because the lifestyle photos clearly showed scale, color accuracy, and use context.
Common Questions and Troubleshooting
"What if my first generation doesn't look perfect?"
That's completely normal and expected. AI generation is iterative. Use the edit feature to refine:
If lighting is too dark: "Add more natural light"
If props feel wrong: "Remove the flowers, add a coffee mug instead"
If background is cluttered: "Simplify the background"
Each refinement costs one credit, but you're building toward exactly what you want.
"How do I know which vibes to choose?"
Think about your ideal customer's Pinterest board. What aesthetic do they gravitate toward? If you sell to:
Wellness-focused buyers: Minimalist, Coastal, Neutral tones
Boho/earthy buyers: Terracotta Sunset, Desert Sage, Natural textures
Luxury buyers: Dark Academia, French Country, Elevated styling
Trendy/young buyers: Coquette, Retro, Playful aesthetics
When in doubt, generate one image in three different aesthetic categories and see which performs best in your Etsy stats.
"Can I use these photos commercially?"
Yes. All images generated in Stageflow come with full commercial rights. You own them. Use them on Etsy, your website, social media, printed marketing materials, anywhere you want.
"What if I need to regenerate photos seasonally?"
This is where the system really shines. When fall arrives and you want autumn-themed photos, you don't need to reshoot anything. Just:
Go back to your saved project
Your original product photo is still there
Add seasonal keywords to your prompt: "autumn leaves," "cozy fall lighting," "pumpkin spice aesthetic"
Generate new variations
Five minutes later, you have fresh seasonal content without touching a camera.
Why This Works (The Psychology Behind It)
You might be wondering: if this is so easy, why isn't everyone doing it?
The truth is, most Etsy sellers don't know this technology exists yet. They're still stuck in the "DIY photography or hire a professional" mindset because that's been the only option for decades.
But here's what the data shows about why this approach works so well:
Variety Beats Perfection
One perfect photo in a single aesthetic will always lose to eight good photos across multiple aesthetics. Why? Because you're not trying to appeal to one customer. You're trying to appeal to thousands of different customers with different taste profiles.
The minimalist who loves clean Scandinavian vibes will scroll past your Boho terracotta photo without clicking. But show that same customer your minimalist variation, and suddenly you're speaking their language.
Context Creates Confidence
Buyers don't just want to see your product. They want to see where it fits in their life. A candle on a white background requires imagination. A candle glowing on a nightstand next to a book and a cup of tea requires zero imagination. The buyer instantly sees themselves using it.
That visual context removes friction from the buying decision.
Consistency Builds Trust
When all eight of your listing photos share a cohesive aesthetic (even if they're in different vibes), you signal to the buyer that you're a professional seller who cares about presentation. That subconscious trust signal is worth more than any written description.
What to Do With Your Extra Time
Here's the beautiful part: you just got 12+ hours back in your week.
You're not spending Saturday afternoon rearranging props under a ring light. You're not scrolling through 200 mediocre photos trying to find eight decent ones. You're not watching YouTube tutorials about smartphone photography techniques.
What could you do with those 12 hours?
Make more product (which you can actually sell)
Respond to customer messages faster
Research new product ideas
Actually take a day off without feeling guilty
The goal isn't just better photos. The goal is a sustainable business that doesn't burn you out.
Your Next Steps
You have two choices right now:
Choice 1: Close this tab, tell yourself you'll try this "eventually," and go back to the same photography struggle you've been dealing with for months.
Choice 2: Spend the next five minutes creating your first professional product photo gallery and see for yourself whether this actually works.
If you choose option two, here's exactly what to do:
Sign up for a free Stageflow account (you get 10 credits, no credit card required)
Take one decent product photo with your smartphone
Follow the exact steps in this guide
Download your first generated image
Compare it to your current listing photos
If you're not impressed, you're out five minutes. If it works (and based on hundreds of Etsy sellers already using this, it will), you just solved your product photography problem forever.
The technology exists. The barrier to entry is gone. The only question is whether you'll use it.
Ready to create your first professional product photo in under 5 minutes? Start with 10 free credits and see the difference for yourself.